This article will be useful for those who are looking for configuring a modem for a broadband connection. I have documented my learnings when I tried to configure a modem (Beetel 110TC1 which was provided by Airtel) for a BSNL broadband connection. Though the article is specific to BSNL broadband connection and beetel modem, the procedure can be applied with any broadband connection and modem.
Open the modem configuration panel. It is required to set all the required connection parameters to make a broadband connection work. To do this open a web browser and enter modem's local ip address. Modem's IP address is usually set as "192.168.1.1". Once you enter the ip address, you will be prompted to enter user id and password. For any modem/router the default user id and password will be either "admin" and "admin" or "admin" and "password" unless you are changing it manually.
In case if you changed the default password and forgot it, then you have only option to make the modem work. It is to do a hardware reset to factory settings. You have to use a pin or a ballpen tip to press the reset button which is placed at the backside of the modem. You have to keep pressing it for a while unless it restarts.
To configure easily, its always better to reset the modem to factory settings. This is to ensure that modem has no changes to some of the settings that we are not interested. Resetting the modem will make the modem to restart. To reset the modem, navigate to "Maintenance" -->"SysRestart".
 When the modem restarts after the reset, navigate to "Interface Setup" --> "Internet". In this panel, we are worried about only four fields which are mentioned below.
a) VPI = 0. (Virtual Path Identifier)
b) VCI = 35. (Virtual Channel Identifier)
c) PPPoE User name and password is provided by BSNL for your connection. You have to get it from them if you don't know it.
When the modem restarts after the reset, navigate to "Interface Setup" --> "Internet". In this panel, we are worried about only four fields which are mentioned below.
a) VPI = 0. (Virtual Path Identifier)
b) VCI = 35. (Virtual Channel Identifier)
c) PPPoE User name and password is provided by BSNL for your connection. You have to get it from them if you don't know it.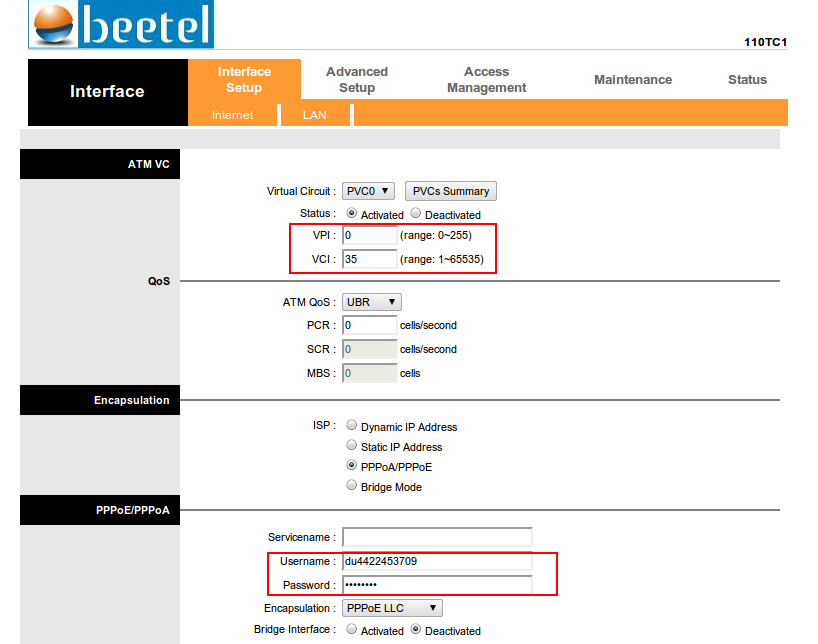 Now you should be able to connect to the Internet.
Note: VPI and VCI settings is ISP specific. For e.g. for BSNL it should be set as 0 and 35. For Airtel it should be 1 and 32. This is usually provided by the ISP. If you are not sure you can do a
google search for "VPI and VCI" for your ISP.
Now you should be able to connect to the Internet.
Note: VPI and VCI settings is ISP specific. For e.g. for BSNL it should be set as 0 and 35. For Airtel it should be 1 and 32. This is usually provided by the ISP. If you are not sure you can do a
google search for "VPI and VCI" for your ISP.
Hello everyone,
In this post, I would like to write on some general topic (in order to target more audience :) ). If you have been a MS-DOS user, you would still love to work on the command prompt. Even now, besides all these graphics stuff, we need to have this command prompt to achieve things quickly, for example, mass deletion of files with some pattern, mass renaming etc. The only problem is, it is hard to navigate to a specific folder through command prompt. And, if the folder is a special folder like My Documents, My Pictures, Desktop etc, then it will be even more tough.
Just imagine, if there is an option in the context menu (menu which appears when you right click on any of the file or folder in Windows Explorer) for each of the folder, which let you to open it through command prompt. There are more software in the market that provide you this facility (and of course, with many others). In this post, I am going to show adding that functionality just by using Windows Registry.
Important Note : Changing Windows Registry values, adding or deleting keys may affect the stability of Windows. So exercise additional care while doing such things.
Here, I have linked one .reg file with which, you can bring the above said functionality to context menu of every folder in the system.
https://sites.google.com/site/lazyprogrammers/openwithcmd
You have to import the contents of the registry file into your system registry as shown below.
1. Execute the .reg file. Either double click or right click and select Merge option.
2. Click Yes for the below option.
 3. Click OK on the next acknowledgement screen.
 That’s it. You have installed this utility. Now go and check any folder in the system by right-clicking it. It should have an option in the context menu as given below.
 Just click on this, the folder will be opened in the command prompt folder. If you are just a computer user, then you can stop reading this post with this. If you are a programmer or if you really want to know what is happening behind the scenes, let’s go further.
In order to understand what this .reg file is really doing to bring this functionality, let’s have a closer look on the below points.
Just click on this, the folder will be opened in the command prompt folder. If you are just a computer user, then you can stop reading this post with this. If you are a programmer or if you really want to know what is happening behind the scenes, let’s go further.
In order to understand what this .reg file is really doing to bring this functionality, let’s have a closer look on the below points.
- Let us first target on, how command prompt is opened with the specified path first. Then we will see how to bring this option into the context menu of every folder.
- Whenever, a command, available in the context menu, is invoked, the full path of the folder will be passed as a command line argument to that particular application.
- We have to invoke the cmd.exe in order to bring the command prompt.
- Just invoking the cmd.exe is not enough. We have to browse to the mentioned folder. So we use the “cd” MS-DOS command for this.
- cmd.exe has an option
- to execute a given command and close itself
- to execute a given command and remains open
- For the later, we have to invoke cmd with /K option.
- So, let us invoke cmd.exe as below.
- cmd.exe /K cd /D “%1”
- cd “%1” will instruct the cmd.exe to browse itself to the invoked folder. %1 here refers the first command line argument, passed to cmd.exe (the full path of the folder in this case).
- We are surrounding %1 with a pair of double quotes in order to avoid issues when the full path of the folder contains any space in it.
- /K option will keep the command window execute the command and keep open.
- /D option will instruct the cd command to change the drive path if required. i.e by default the command prompt will be invoked with C: as the working drive. If we open a folder which resides in other foler, then the cd command will change the directory and browse to the specified path.
Now, we have this setup ready. All we have to do is to hook it to the commands available in the context menu of every folder. For this, we have to understand how Windows Registry and how it is organized. I will, in future, write a separate post on this subject (as far as I know). For the time being, let’s concentrate on only one Key set called HKEY_CLASSES_ROOT.
This key set contains all known file extensions of a machine. The “known file extensions” here mean, that Windows knows, how to handle files with those extensions. For example, .txt, .bmp, .jpg are few of them. It has some special sub keys for Directory and Drive. We have to modify the Directory sub key in order to achieve this.
Execute regedit from Run window to get the registry editor.Goto HKEY_CLASSES_ROOT\ Directory in the left side tree view. Expand all the sub keys under this key.
The screen should look like this.
 Now let us have a closer look on the shell sub key. This key contains the commands available in the context menu of a folder. I have the VLC player installed and hence you can see the Add to Playlist, Play with VLC command related keys under the Shell key.
Now, we have to add a new key under this shell and let’s name it as OpenWithCMD. Below picture shows, how to do this.
Now let us have a closer look on the shell sub key. This key contains the commands available in the context menu of a folder. I have the VLC player installed and hence you can see the Add to Playlist, Play with VLC command related keys under the Shell key.
Now, we have to add a new key under this shell and let’s name it as OpenWithCMD. Below picture shows, how to do this.
 This key has a default value, which you can see in the right side of the Registry editor screen. This tells Windows, what would be the caption of this menu item in the screen. So let us give Open with Command Prompt as the value here.
 If you use & key before any of the character in this default value, that will be shown as underlined in the screen and will be used as the accelerator key for that option (as in Visual Basic.NET). For example, if you enter “O&pen with Command Prompt”, it will be shown in the menu as “Open with Command Prompt”. So after you opened the context menu, if you press character “p”, it will highlight this command immediately. If you don’t have any other command in the menu with p underlined, then this command will be immediately executed. In this way, you can accelerate the command.
Now let us create a subkey under this OpenWithCMD key. This is similar to how we create the OpenWithCMD key. We have to name it as “command” as it contains the command definition of this menu option.
After creating command key, goto the default value of that key (in the right side window). Give the command that we prepared in the above section, as the default value.
cmd.exe /K cd /D "%1"
Click on OK. Now it’s ready to work. Without even refresh, just go to any Windows explorer, and check the context menu of any folder. Our newly created option should be available.
In Registry editor, we have an option to export or import any key with values. So I exported the above created key into the OpenWithCMD.reg file and attched here. This will make the installation job of this utility (!?) easier :)
If you use & key before any of the character in this default value, that will be shown as underlined in the screen and will be used as the accelerator key for that option (as in Visual Basic.NET). For example, if you enter “O&pen with Command Prompt”, it will be shown in the menu as “Open with Command Prompt”. So after you opened the context menu, if you press character “p”, it will highlight this command immediately. If you don’t have any other command in the menu with p underlined, then this command will be immediately executed. In this way, you can accelerate the command.
Now let us create a subkey under this OpenWithCMD key. This is similar to how we create the OpenWithCMD key. We have to name it as “command” as it contains the command definition of this menu option.
After creating command key, goto the default value of that key (in the right side window). Give the command that we prepared in the above section, as the default value.
cmd.exe /K cd /D "%1"
Click on OK. Now it’s ready to work. Without even refresh, just go to any Windows explorer, and check the context menu of any folder. Our newly created option should be available.
In Registry editor, we have an option to export or import any key with values. So I exported the above created key into the OpenWithCMD.reg file and attched here. This will make the installation job of this utility (!?) easier :)
A short note about short-circuiting
C# (almost all the languages) has the feature called short-circuiting. This is used when evaluating expressions that use “and” and “or” operators. You might have experienced this feature. If not, let us learn through the below code snippet. class Program { public static void Main(string[] args) { if(methodOne() && methodTwo()) { Console.WriteLine("In Then block"); } else { Console.WriteLine("In Else block"); } Console.ReadKey(true); } private static bool methodOne() { Console.WriteLine("In methodOne"); return false; } private static bool methodTwo() { Console.WriteLine("In methodTwo"); return false; } } If you run the above code snippet, ideally, the output should be,In methodOneIn methodTwoIn Else blockBut the actual result will beIn methodOneIn Else blockSurprised? Just recall the logical AND gate table.| Input A | Input B | Output |
| true | true | true |
| true | false | false |
| false | true | false |
| false | false | false |
Here, if you check, even if one of the value is false, (no matter what the other value is), the output will always be false. In our case, the first part (method call “methodOne”) will be evaluated and determined as false. So, even if methodTwo() returns a true, still the expression will result as false. So C# (and most other languages) won’t process the second part of the expression and just enters into the else part to proceed. Hence, we got the above output.Let us check the functionality of OR operator (||). public static void Main(string[] args) { if(methodOne() || methodTwo()) { Console.WriteLine("In Then block"); } else { Console.WriteLine("In Else block"); } Console.ReadKey(true); } private static bool methodOne() { Console.WriteLine("In methodOne"); return true; } private static bool methodTwo() { Console.WriteLine("In methodTwo"); return false; }This is similar to the above snippet, except that we have changed the return value of methodOne, and the expression in the “if” statement. Now, let us check the output.The output will be In methodOneIn Then blockinstead of In methodOneIn methodTwoIn Then blockThe reason is same. Since, first part of expression evaluates to true, the second part of the expression will not be checked (this is because, irrespective of the result, always the condition will succeed). Please refer the below table of logical OR gate.| Input A | Input B | Output |
| true | true | true |
| true | false | true |
| false | true | true |
| false | false | false |
In our case, the second part is just a simple method call. If the second part is a very big expression, the runtime will unnecessarily spend time in checking the second part, which anyway will not affect the result. (Please note, if the first part’s result is not enough to determine the result of the expression i.e., if first part returns true in first code snippet, then runtime will always go for evaluating the second part.)So the runtime, safely skips the second part, saves some time and proceeds with the next valid executable statement. This is called short-circuiting. This is the common behavior of many languages. From the beginning, I am using, “most of the”, “many of the” prefixes to “languages” so far, as the language, Visual Basic (all flavors including .NET!) will always evaluate both parts of the expression before moving into Then or Else parts. However, they have (from .NET 1.0 I guess) introduced two new operators “AndAlso”, and “OrElse” which provides the short-circuiting behavior to VB.NET programmers. So if you are a VB.NET programmer, be careful before using normal “And” and “Or” operators hereafter :)Overriding short-circuiting behaviorEven though, we find this short-circuiting behavior is cute and saves some time, we may have some situations where we don’t want this behavior.For example, (our above sophisticated scenario is one good example!!) if you port a VB program into C# and want to maintain the same “And’ and “Or” functionality in C# as well, you may have to override this behavior. I really don’t see any other genuine reasons to avoid this feature (if you know, please share with me through comments). C# (I am not sure about the other languages), offers a way to override this default behavior. We can rewrite the “if” statement of the second code snippet as given below.if(methodOne() | methodTwo())Note that, there is now only one pipe symbol (|) in place. This will force the runtime to evaluate both the parts of the expressions and complete the evaluation. So, the result will beIn methodOneIn methodTwoIn Then blockThe same can be done for && operator. Just replace && with single & and check the first code snippet the answer will beIn methodOne In methodTwo In Else blockSo, what this single pipe symbol or single ampersand symbol really does? These operators are called bitwise operators. These will evaluate the expressions fully, obtain both the results, check them bit wise and derive the answer. Based on the answer, they will act upon.Check the output of below two statements. Console.WriteLine(4 | 6); Console.WriteLine(4 & 6);The output will be 6 and 4 respectively. They will operate on bitwise on both 4, 6 like below.4 = 100 (binary equivalent)6 = 110 (binary equivalent)Now let’s do a bitwise OR.4 | 6 will be converted to 100|||110===110===ie from right to left, 0 or 0, 0 or 1, 1 or 1. Then the result is converted into decimal and the answer is 6. The same applies for bitwise AND.4 & 6 will be converted to100&&&110===100===ie, from right to left, 0 and 0, 0 and 1, 1 and 1. Then the answer is converted to decimal and the answer is 4!Since, both the results are required, to perform the bitwise OR and AND, the short-circuiting functionality is overridden. The same is happening for bool in the above code snippet. The operators evaluate both expressions and do a bitwise operation on them and produces the result. This is a suggested way by Microsoft to override the short-circuiting behavior.Happy coding!
